


Weddings
Embracing the D.I.Y
Stephanie Weiss, 417-land wedding planner and owner of Ella Weiss Wedding Design, dives into the D.I.Y. wedding scene for the first time and shares how you can recreate this simple project at home.
By ettie berneking | photos by Kevin O'Riley, Jamie Kalil
Dec 2013
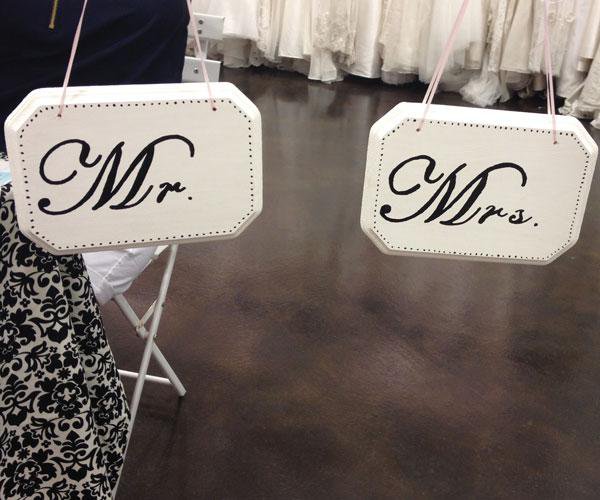

As the owner of the bridal shop Ella Weiss Wedding Design and a wedding coordinator, Stephanie Weiss is always on the lookout for the next hot trend in the wedding world. With D.I.Y. projects being the latest craze, Weiss and her interns decided to join in on the fun and host a night where brides-to-be could create something for their weddings while socializing with other local brides. “We’ve seen a lot of our brides carry the Mr. and Mrs. signs, and we thought it would be great to make them so they could hang on their chairs at the reception,” Weiss says. After gathering the materials needed, Weiss uncorked a bottle of wine and opened the doors of Ella Weiss Wedding Design to 10 eager brides who spent the evening crafting while happily chatting about their upcoming weddings. The D.I.Y. Night was such a success that Weiss decided to host more craft-filled evenings. If you missed her first D.I.Y. Night, don’t fret. Here are the instructions for the wedding plaques, so you can start crafting your own at home.
Supplies:
• Two wooden plaques
• Black ribbon or twine
• Drill
• Fine-tipped paintbrushes
• Primer
• All-purpose white craft paint
• Stencils (You can find these at most craft stores.)
Directions:
1. Drill two holes at the top corners of each wooden plaque.

2. Prime and paint the plaques, and let them dry.

3. Paint “Mr.” on one plaque and “Mrs.” on the other plaque using the stencils.

4. Use a black ribbon to string through the holes. For a more rustic look, use twine.